 |
||
|
|
There are hundred kinds of NAT devices out there in the market and we can not guide You through each of them, but the "concept" is the same, so If you see our guide and understand the meaning of each step, You will be able to setup Your router properly. |
| TOPIC !! What ports are used by a web server? |
The first step to connect to Your NAT is to connect to its web administration interface, usually a NAT comes with a web based admin interface, and of course You need to read the manual for how to connect to it. But here comes a tip, usually, if Your local PC IP address is 192.168.0.x, then try to connect to http://192.168.0.1/ Most of the NAT requires You to enter the username and the password, please refer to its manual for the default one. After You login the NAT, look for the Address translation or the Port mapping sections, and try to add a new rule for all incoming connections made to the NAT's public address at port 80, forward them to Your local PC's IP address at the same port 80. Simply do the same for the port 443 and remember that only apply this to TCP protocol. |
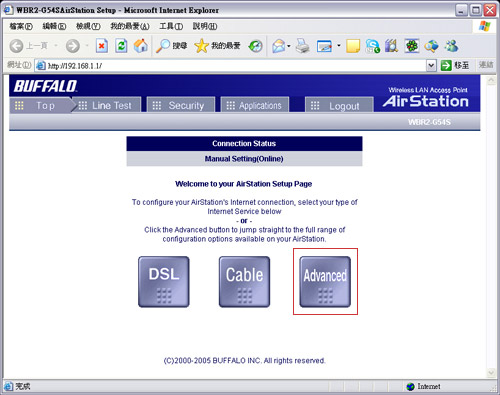
| TOPIC !! Trying the rules on a real NAT buffalo AirStation series router |
Connect to Your NAT's web interface, and login.
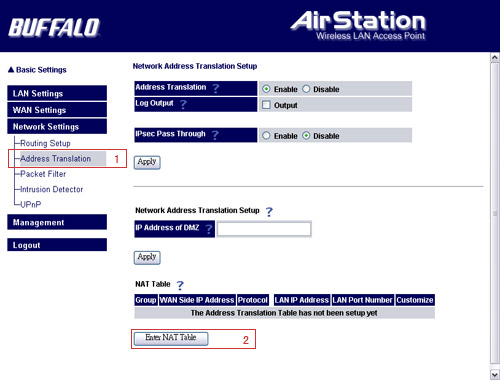
Click advanced and look for address translation setting.
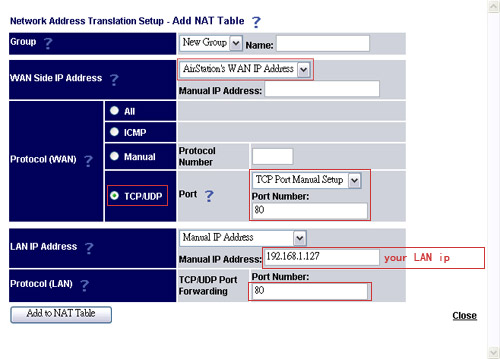
Click ENTER NAT TABLE, and input the first rule for port 80, remember to lookup Your local PC's LAN ip-address by the command, ipconfig.exe under windows command line prompt.
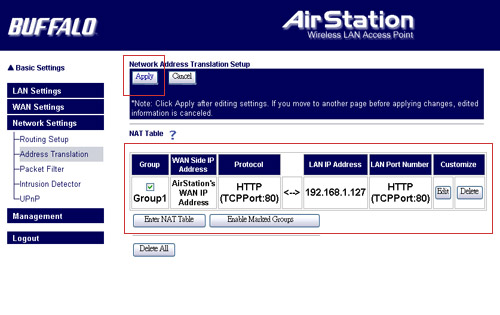
Click ADD TO NAT TABLE, You will see this new rule, don't forget to apply and restart Your NAT.
|
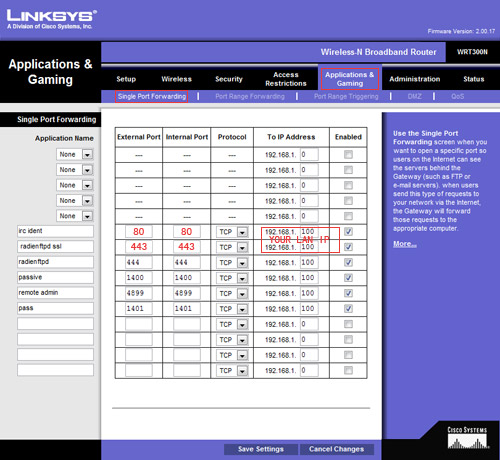
| TOPIC !! Trying the rules on a real Lynksys series router |
Connect to Your NAT's web interface, and login. Click Application & Gaming -> Single Port Forwarding: Add 2 rules for RaidenHTTPD web server, external port 80, internal port 80, protocol tcp, to ip address = Your LAN IP-address,enable external port 443, internal port 443, protocol tcp, to ip address = Your LAN IP-address,enable And if you are setting up RaidenFTPD ftp server, add the rules like above but for your server port, implicit ssl port and explicit ssl port.
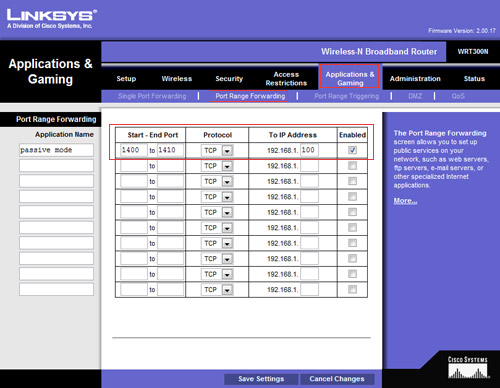
The rules for web server is done, but if you are setting up a RaidenFTPD you need to setup data ports forwarding too. Click Application & Gaming -> Port Range Forwarding:
|
|
© 2002-2009, RaidenHTTPD TEAM
|


